Every engineering team has seen it: a developer needs to spin up a new Kubernetes namespace to test a service in isolation. Or maybe deploy a temporary PostgreSQL database to debug a staging issue. Instead of provisioning it themselves, they raise a ticket with the DevOps team. Then they wait. Sometimes for hours. Sometimes for days.
This wait isn’t because the DevOps team is slow. It’s because they’re already stretched thin – troubleshooting production issues, reviewing infrastructure pull requests, managing CI/CD jobs, rotating secrets, and responding to alerts. A seemingly small request, like setting up a namespace or database, often gets pushed to the bottom of the queue.
As more teams grow and ship faster, this friction only gets worse. Developers get blocked waiting for resources, and DevOps becomes a bottleneck. Everyone ends up working around delays instead of fixing them.
A self-service portal solves this problem by giving developers controlled access to the infrastructure they need – without going through tickets or Slack threads. For teams just starting out, it’s common to ask, what is a self service portal and how does it fit into our workflow?
In this blog, we’ll look at why developer self-service is important, how it fits into existing DevOps workflows, and walk through an example of building a self-service portal using Backstage and then with the Cycloid platform.
Why Do Developers Need a Self-Service Portal?
In many organisations, developers rely on platform or DevOps teams to provision basic infrastructure. Even simple requests – like spinning up a test environment, launching a temporary PostgreSQL instance, or deploying a microservice behind a load balancer – often require submitting a ticket and waiting in line.
These are not edge cases; they’re common, repeatable actions. But because they depend on someone else to approve and execute them, they slow teams down. Platform teams get overwhelmed, queues grow, and even small changes start to feel heavy. Mistakes also slip in – like missing security configurations, inconsistent tagging, or misaligned environments.
This is where a self-service portal makes a real difference. Instead of pushing everything through a central team, developers get access to pre-approved workflows that they can run themselves. They aren’t writing Terraform or clicking through the AWS console. They’re filling out a short form that triggers automation behind the scenes – using infrastructure-as-code that already follows the organisation’s best practices.
For example, a template might automatically enforce encryption, region selection, subnet placement, and tagging for every resource it provisions. Developers get the environments they need, fast. And the platform team stays in control – without being in the way. This kind of self web service model reduces operational dependency while keeping everything secure and auditable.
Portals like Backstage make this model more practical. Backstage is an open-source self service platform and framework that helps you expose these workflows to developers through a consistent UI. Teams like Monday.com use this pattern to let engineers launch new services, environments, and jobs in minutes – while keeping everything governed and trackable.
Self-service doesn’t mean giving up control. It means enabling developer self service – giving teams safe access to repeatable infrastructure so they can move faster without opening tickets for every small task.
How Does a Self-Service Portal Fit into DevOps Workflows?
A self-service portal doesn’t just make requests faster – it changes how infrastructure is managed across the organisation. It fits neatly into modern DevOps workflows by shifting the burden of execution without sacrificing standards or control. Developers can move forward on their own, while platform and DevOps teams stay in control of what’s actually being provisioned.
Turning Manual Tasks Into Reusable Workflows
Traditionally, infrastructure changes involve manual coordination – even if Terraform or CloudFormation is being used. A developer writes the code, raises a pull request, waits for a DevOps engineer to review it, and then someone approves and runs the terraform apply step. Each of these stages requires a human in the loop, which is where delays start to build up.
With a self-service setup, these tasks are turned into reusable templates. The DevOps team encodes all the necessary rules – region configs, IAM permissions, cost centre tags – into Terraform modules or CLI scripts. These are then wrapped inside simple forms that developers can access through a portal like Backstage.
Now, when a developer needs an RDS instance or a new S3 bucket, they’re not opening a ticket – they’re just filling out a form. Behind the scenes, the same Terraform code gets applied, the same permissions are used – but it happens automatically.
Integrating With Existing CI/CD and GitOps Workflows
This setup doesn’t replace your existing workflows – it integrates with them. Whether you’re using GitHub Actions, GitLab CI, or any other CI/CD tool, a self-service portal can connect directly into your pipeline and trigger the same infrastructure automation you’re already using.
For example, a request through the portal might trigger a workflow that:
- Creates a GitHub repo
- Pushes default Terraform configs
- Runs terraform apply
- Updates the software catalog
- Notifies the developer when it’s done
Because these steps follow the same pipeline rules as the rest of your infrastructure, you get consistency and auditability without needing to involve someone from your end.
Managing Permissions Without the Headaches
Managing access in the cloud is often where things start to get messy. Teams need to know who’s allowed to create resources, who owns them, and what limits are in place. Without a clear system, these decisions happen informally – maybe over a Slack message, or hidden in some old script no one remembers writing.
A self-service portal fixes this by using role-based access. Access is not decided on the fly; it’s tied to teams and permissions set by the organisation. For example, only members of the data team can create Redshift clusters. Developers in the frontend team might only have access to certain S3 buckets or Lambda functions.
This approach removes guesswork. Everyone knows what they can and can’t do. It also makes the system more secure and easier to manage as the company grows. Instead of relying on memory or manual approvals, access is automated and clearly defined in one place.
Keeping Governance and Control in Place
Giving developers direct access doesn’t mean giving up control. Everything they do through the portal is predefined and approved by the DevOps team. From resource naming conventions to security groups, every config is baked into the underlying automation.
Instead of reviewing every request, the DevOps team reviews the templates. Once something is encoded in a template, it becomes the source of truth. That way, the infrastructure stays compliant – even when developers are provisioning it themselves.
A self-service portal brings structure to how infrastructure is requested and managed. Developers can move faster because they no longer have to wait for someone to create resources for them. At the same time, DevOps teams stay in control by setting the rules in advance.
This approach helps both sides. Developers are unblocked, and DevOps teams aren’t buried under routine tickets. Self service portals bring clarity, consistency, and autonomy to infrastructure provisioning across teams.
Everything runs through automation that’s already approved, so nothing breaks standards or policies.
As companies scale, this way of working becomes important. It keeps things organised, reduces mistakes, and makes it easier for teams to manage cloud resources across projects and environments. A good self-service portal is not just a convenience – it’s a key part of scaling your development process the right way.
How to Set Up a Self-Service Portal with Backstage
Till now, we have seen how self-service portals remove bottlenecks by letting developers provision infrastructure without waiting on DevOps. Now, let’s walk through building a working example of this with Backstage.
We’ll create a Backstage template that lets developers spin up an S3 bucket with a few inputs. The process will trigger the AWS CLI under the hood, but the developer never sees that complexity. By the end, we’ll have a fully automated portal experience.
Step 1: Create the Template Directory
We’ll start by creating a dedicated folder for our template:
mkdir -p packages/backend/templates/s3-bucket
Inside this folder, we’ll define the actual template.yaml, and optionally include additional files like README.md, reusable scripts, or custom actions.
Step 2: Define the Template YAML
Let’s now define our template at
packages/backend/templates/s3-bucket/template.yaml:
| apiVersion: scaffolder.backstage.io/v1beta3 kind: Template metadata: name: create-s3-bucket title: Create an S3 Bucket description: Provisions an S3 bucket using AWS CLI and applies basic settings spec: owner: cloud-team type: infrastructure parameters: – title: Bucket Configuration required: – bucketName – region – visibility properties: bucketName: type: string title: S3 Bucket Name region: type: string title: AWS Region default: us-east-1 visibility: type: string title: Visibility enum: – private – public steps: – id: validate name: Validate Inputs action: debug:log input: message: Creating bucket “${{ parameters.bucketName }}” in region “${{ parameters.region }}” with visibility “${{ parameters.visibility }}“ – id: create name: Create Bucket action: execute:script input: script: | aws s3api create-bucket \ –bucket ${{ parameters.bucketName }} \ –region ${{ parameters.region }} \ –create-bucket-configuration LocationConstraint=${{ parameters.region }} if [ “${{ parameters.visibility }}” = “public” ]; then aws s3api put-bucket-acl \ –bucket ${{ parameters.bucketName }} \ –acl public-read fi aws s3api put-bucket-versioning \ –bucket ${{ parameters.bucketName }} \ –versioning-configuration Status=Enabled |
This template gives your self-service portal a title, description, form fields, and execution steps. Developers just provide a name, region, and visibility level – everything else is handled by the backend script.
Step 3: Register the Template in app-config.yaml
In your root app-config.yaml, add or update the catalog locations section like this:
| catalog: locations: – type: file target: ./packages/backend/templates/s3-bucket/template.yaml |
Then restart Backstage:
| yarn dev |
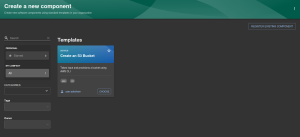
You’ll now see the Create an S3 Bucket template listed under the Create section.
Step 4: Add Custom Script Support
Instead of hardcoding long shell scripts in the template.yaml, we can extract the logic into a script file.
Create this file:
| touch packages/backend/templates/s3-bucket/create-bucket.sh chmod +x packages/backend/templates/s3-bucket/create-bucket.sh |
| #!/bin/bash BUCKET_NAME=$1 REGION=$2 VISIBILITY=$3 aws s3api create-bucket \ –bucket “$BUCKET_NAME“ \ –region “$REGION“ \ –create-bucket-configuration LocationConstraint=“$REGION“ if [ “$VISIBILITY“ = “public” ]; then aws s3api put-bucket-acl \ –bucket “$BUCKET_NAME“ \ –acl public-read fi aws s3api put-bucket-versioning \ –bucket “$BUCKET_NAME“ \ –versioning-configuration Status=Enabled |
Now update the execute:script step in template.yaml like this:
| – id: create name: Run Script action: execute:script input: script: | ./packages/backend/templates/s3-bucket/create-bucket.sh \ “${{ parameters.bucketName }}” \ “${{ parameters.region }}” \ “${{ parameters.visibility }}” |
This improves readability and lets you reuse the script for other templates.
Step 5: Update Dockerfile to Include AWS CLI
Update your packages/backend/Dockerfile (or wherever your backend is built):
| FROM node:18 # Install AWS CLI RUN apt-get update && \ apt-get install -y curl unzip && \ curl “https://awscli.amazonaws.com/awscli-exe-linux-x86_64.zip” -o “awscliv2.zip” && \ unzip awscliv2.zip && ./aws/install WORKDIR /app COPY . . RUN yarn install –frozen-lockfile CMD [“yarn”, “start”] |
You can verify CLI availability by adding this to the script:
| aws –version |
Step 6: Configure AWS Credentials
Use one of the following:
- Environment variables (via .env file or shell):
| export AWS_ACCESS_KEY_ID=your-key export AWS_SECRET_ACCESS_KEY=your-secret |
- Mount local AWS credentials in dev:
| docker run -v ~/.aws:/root/.aws … |
Step 7: Create the Bucket from Backstage
From the Backstage UI, developers can use the self service portal login to access the creation page.
- Go to Create

- Select the Create an S3 Bucket template
- Fill in the form: bucket name and region
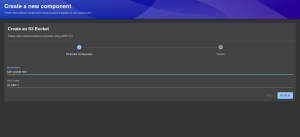
- Click Next → Review → Create
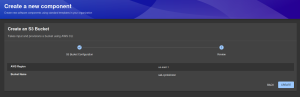
We just created a working self-service setup for AWS S3 using Backstage. Developers now have a UI where they can fill a form, hit “Create,” and get a bucket – automated, consistent, and safe.

The same pattern can be extended to create EC2 instances, IAM users, Lambda functions, and even full applications with CI/CD pipelines.
How Cycloid Handles Cloud Asset Management Across Multiple Clouds
Setting up a self-service portal with Backstage gave us flexibility and control, but it also demanded a lot of effort. Every part of the experience – catalog structure, templates, scripts, workflows – had to be assembled piece by piece. While this modularity is powerful, the responsibility of keeping it together sits entirely with the engineering team.
For organisations looking to move faster without building everything from scratch, Cycloid offers a very different approach. It brings the same developer self-service experience and governance – but without asking you to host or build the portal yourself.
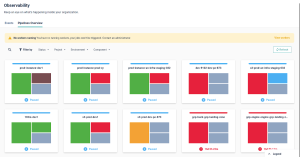
Cycloid’s interface is ready to go the moment you log in. Instead of wiring up plugins or extending YAML definitions, you land on a dashboard that already shows your cloud activity, usage metrics, and key project insights. It’s designed for teams who want to focus on delivering infrastructure, not maintaining the tooling around it.
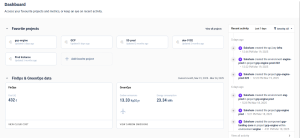
From this dashboard, you can monitor everything – from project health to pipeline runs and FinOps data. There’s no need to plug in a metrics tool or cloud cost tracker separately; it’s all included.
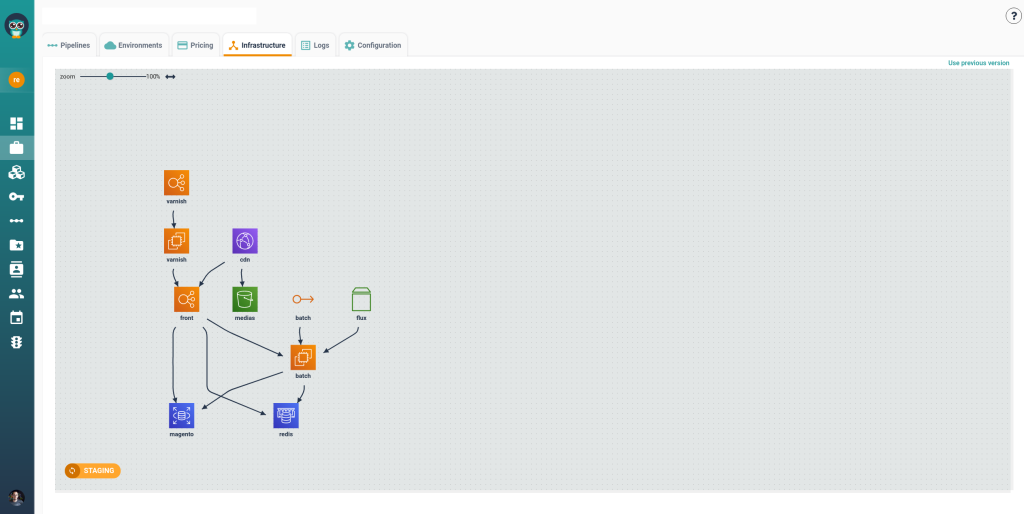
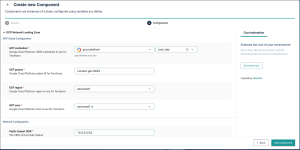
Where Backstage required us to manually define infrastructure workflows using templates and scripts, Cycloid lets you define reusable modules using Stacks. Each stack acts as a packaged infrastructure unit – a VM, a Kubernetes cluster, an S3 bucket – that your teams can provision through simple forms. These are powered by your existing Terraform or Ansible logic, so you’re not rewriting anything. You’re just abstracting it in a way that makes it safe for other teams to use.
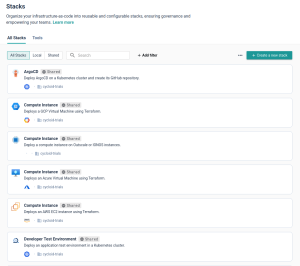
All stacks are versioned and stored in your Git repository, giving you the same transparency and traceability you’d expect from a GitOps workflow. But instead of wiring everything up through Backstage plugins, Cycloid handles the frontend and lifecycle orchestration for you. The UI, input forms, and even the permission checks are already wired in. You only need to define what variables should be exposed and how the infrastructure should be applied.
Once a stack is triggered, Cycloid automatically runs the associated pipeline and gives you visibility into its progress. Cycloid handles visibility, automation, and inventory out of the box – across AWS, GCP, Azure, and hybrid setups. You don’t need to manage pipelines or plugins manually.
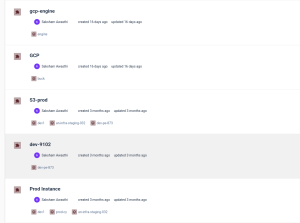
This built-in visibility changes how teams operate. You’re no longer switching between cloud consoles or asking around for access details. Everything is visible in one place, and access is controlled by pre-defined roles and group mappings. If someone spins up an EC2 instance or a Kubernetes workload, it appears in the inventory, mapped to the right team and environment.
Cycloid also exposes this inventory through APIs, allowing teams to pull asset data into their own dashboards, automate cleanup tasks, or connect it to policy engines. It acts not just as a portal, but as a glue layer between infrastructure, automation, and governance.
The key difference is in how much you have to build yourself. With Backstage, you’re setting up the foundation first – catalogs, actions, plugins – and layering functionality on top. With Cycloid, the foundation is already laid. You bring your Terraform, your pipelines, and your cloud credentials – and everything else, from the UI to the inventory, is already there waiting.
With Backstage, you build the portal and the automation. With Cycloid, you just focus on the automation. That shift – from building the framework to just plugging in your own logic – makes a huge difference in speed, effort, and return on investment.
Conclusion
Self-service portals help teams move faster by giving developers the tools to provision infrastructure on their own – safely and consistently. Whether you build your own setup with Backstage or use a ready platform like Cycloid, the goal stays the same: reduce wait times, avoid manual bottlenecks, and keep control in the hands of your DevOps team.
If you’re just starting out, Backstage gives you full control. If you want to move fast with less setup, Cycloid gives you everything out of the box. Choose the path that fits your team – and start unblocking developers today.
Frequently Asked Questions
What is a self-service portal in DevOps?
A self-service portal lets developers provision infrastructure or services on their own using pre-approved templates, reducing reliance on DevOps teams.
Why use Backstage for building a self-service portal?
Backstage is open-source, highly extensible, and integrates well with CI/CD tools—making it ideal for exposing infrastructure automation through an easy-to-use UI.
Why use Cycloid as your self-service portal?
Cycloid brings developer self-service experience and governance, with a ready to go interface from log in. It acts not just as a portal, but as a glue layer between infrastructure, automation, and governance.
Is it possible to scale a self-service portal for a large team?
Yes, with role-based access, reusable templates, and GitOps practices, self-service portals can scale securely across multiple teams and environments.
What’s the best way to implement a self-service portal in an enterprise?
Start with a small use case like S3 provisioning, define clear governance rules, and gradually expand with tools like Backstage or platforms like Cycloid for faster adoption.